前端工程化之项目脚手架
前端学习栈2020-12-19 13:47


在建筑领域,脚手架是为了保证各施工过程顺利进行而搭设的工作平台。在软件开发领域,如果把搭建项目想象成建造大型建筑的话,脚手架就是为了方便大家快速进入业务逻辑的开发,一个好的脚手架能显著提升工程效率,例如三大前端框架都提供了自己的脚手架工具:
Angular 中的 @angular/cliVue 中的 @vue/cliReact 中的 create-react-app上述工具虽好,但相信很多公司为了满足自身业务需要,也造了不少自己的轮子,约定使用自己的那一套配置,如果没有脚手架,就只能把原项目代码复制过来,删除无用的逻辑,只保留基础能力,这个过程琐碎且耗时。
因此,在这种情况下,就需要定制自己的开发模板,搭建一套属于自己的前端脚手架了。
预备知识
要写一个脚手架首先要掌握 node.js 的各种 API,然后还要充分利用别人写好的一些类库,例如下面就是必备的:
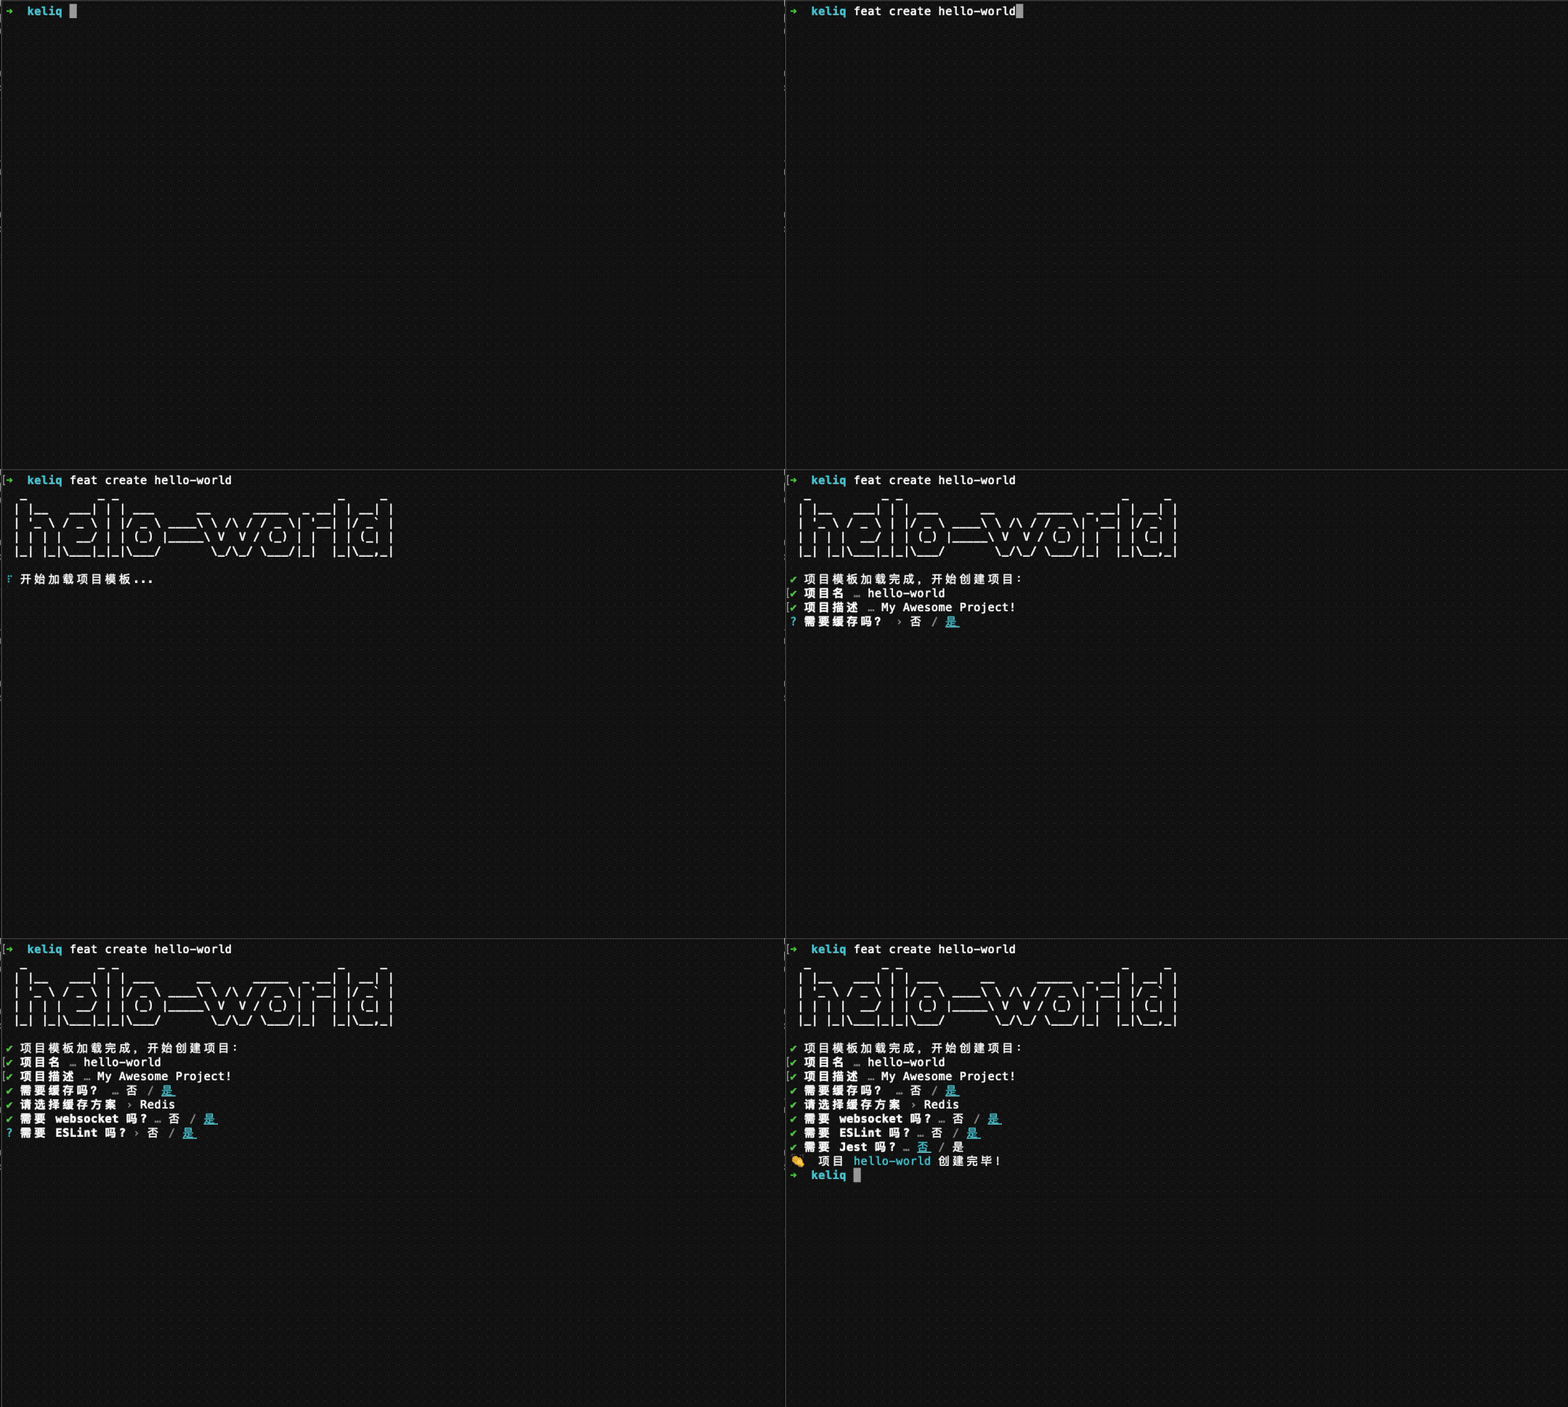
commander :TJ 大神的又一神作,脚手架必备工具,能够帮我们解析命令行的各种参数,通过回调完成具体逻辑实现。inquirer:强大的交互式命令行工具,用户可以在命令行进行单选或多选,也可以用 prompts 这个库,用法和效果都是类似的。chalk :能够在命令行中给文本上色,从而突出重点,例如 error 用红色,warning 用黄色,success 用绿色,视觉效果非常好。metalsmith :静态网站生成器,可以读取指定文件夹下面的模板文件,经过一系列的插件处理,把文件输出到新的目录下。掌握了上面的工具之后,就可以写一个自己的脚手架了。我们后端采用了 feathersjs 库,但是不太喜欢它提供的脚手架,于是自己定制了一个,效果如下:

制作脚手架
制作脚手架整个过程分如下 5 个步骤(简称 cpcar):
cli 项目初始化parse 命令行参数clone 脚手架模板ask 用户项目配置render 项目文件接下来逐一介绍:
cli 项目初始化
首先创建空目录并进行初始化:
$ mkdir feathers-cli$ cd feathers-cli$ npm init -y复制代码然后用 vscode 打开,为 package.json 添加 bin 字段如下:
{ "name": "feathers-cli", "main": "index.js", "bin": { "feat": "./bin/feat.js" }}复制代码然后创建 bin 文件夹,在里面新建一个 feat.js 文件,内容是:
#! /usr/bin/env nodeconsole.log('My custom feathers scaffold')复制代码然后在根目录下执行:
$ npm link$ featMy custom feathers scaffold复制代码到这里,项目初始化就完成了。此时,npm 会在全局下创建一个 feat 可执行文件,它是一个软链接,指向 bin/feat.js,所以后面每次修改内容,都会输出最新的结果,不需要重新执行 npm link 命令。
parse 命令行参数
接下来需要利用 commander 来解析命令行参数,例如当用户输入 feat --help 的时候能够输出帮助提示,首先安装依赖包:
$ npm i commander复制代码然后修改 bin/feat.js 内容为:
#! /usr/bin/env nodeconst program = require('commander')program.parse(process.argv)复制代码此时输入命令就能看到提示消息了:
$ feat --helpUsage: feat [options]Options: -h, --help display helpforcommand复制代码这是 commander 默认帮我们添加的帮助信息,目前还没有配置任何的命令,接下来完善代码如下:
#! /usr/bin/env nodeconst program = require('commander')const pkg = require('../package.json')program .command('create <app-name>') .description('create a new project powered by feathers-cli') .option('-f, --force', 'override') .action((name, cmd) => {console.log('name', name)console.log('cmd.options', cmd.options)console.log('cmd.args', cmd.args) })program.version(pkg.version).usage(`<command> [options]`)program.parse(process.argv)复制代码此时输出内容就丰富多了:
$ feat --helpUsage: feat <command> [options]Options: -V, --version output the version number -h, --help display helpforcommandCommands: create [options] <app-name> create a new project powered by feathers-clihelp [command] display helpforcommand复制代码输入 feat create xxx 的时候可以在回调里面获取到相关参数:
name hello-worldcmd.options [ Option { flags: '-f, --force', required: false, optional: false, variadic: false, mandatory: false, short: '-f', long: '--force', negate: false, description: 'override', defaultValue: undefined }]cmd.args [ 'hello-world' ]复制代码接下来就是完善回调函数里面的逻辑了。
clone 脚手架模板
我们根据业务需求自己定义了一套模板 feathers-template-default,用脚手架创建项目的本质上就是把这套模板下载下来,然后再根据用户的喜好,按照模板生成不同结构的工程文件而已。
一般来讲,模板都是放到用户根目录下的一个隐藏文件中的,我们定义的目录名为 ~/.feat-templates,首次通过 feat create xxx 的时候通过 git clone 把这套模板下载到上面定义的目录中,后面再创建项目只需 git pull 更新即可,所以接下来就是实现仓库的下载和更新方法了,其实就是利用 spawn 对 git 命令进行封装:
git clone 的封装
// 克隆仓库functionclone(repo, opts) {returnnewPromise((resolve, reject) => {const args = ['clone'] args.push(repo) args.push(opts.targetPath)const proc = spawn('git', args, {cwd: opts.workdir}) proc.stdout.pipe(process.stdout) proc.stderr.pipe(process.stderr) proc.on('close', (status) => {if (status == 0) return resolve() reject(newError(`'git clone' failed with status ${status}\n`)) }) })}复制代码git pull 的封装
asyncfunctionpull(cwd) {returnnewPromise((resolve, reject) => {const process = spawn('git', ['pull'], { cwd }) process.on('close', (status) => {if (status == 0) return resolve() reject(newError(`'git pull' failed with status ${status}`)) }) })}复制代码ask 用户项目配置
有了模板,项目主体结构就定下来了,接下来就是定义一些问题,让用户自己选择项目配置:
const questions = { projectName: { type: 'text', message: '项目名', validate: (answer) => (answer.trim() ? true : '项目名不能为空'), initial: 'my-project', }, projectDescription: { type: 'text', message: '项目描述', initial: 'My Awesome Project!', }, needCacher: { type: 'toggle', message: '需要缓存吗?', initial: true, active: '是', inactive: '否', }, cacher: { type: 'select', message: '请选择缓存方案', choices: [ { title: 'Memory', value: 'Memory' }, { title: 'Redis', value: 'Redis' }, ],when(answers) {return answers.needCacher }, initial: 1, }, needWebsocket: { type: 'toggle', message: '需要 websocket 吗?', initial: false, active: '是', inactive: '否', }, needLint: { type: 'toggle', message: '需要 ESLint 吗?', initial: true, active: '是', inactive: '否', }, needJest: { type: 'toggle', message: '需要 Jest 吗?', initial: true, active: '是', inactive: '否', },}复制代码然后通过一个循环进行遍历,挨个询问:
asyncfunctionask(questions, data) {const names = Object.keys(questions)for (let i = 0; i < names.length; i++) {const name = names[i]const value = questions[name]// 拿到问题,然后组装成 Inquirer 或 prompts 所需要的格式const question = { /* 省略组装代码 */ } const answer = await prompts(question)Object.assign(data, answer) }}复制代码render 项目文件
模板引擎有很多,例如 ejs、handlebars 等都可以用,在这里以 handlebars 为例,先定义两个帮助函数:
Handlebars.registerHelper('if_eq', function (a, b, opts) {return a === b ? opts.fn(this) : opts.inverse(this)})Handlebars.registerHelper('unless_eq', function (a, b, opts) {return a === b ? opts.inverse(this) : opts.fn(this)})复制代码然后通过 metalsmith 插件进行渲染:
Metalsmith(process.cwd()) .metadata({ projectName: '项目名称', projectDescription: '项目描述',// 这里的数据实际上是上一步 ask 获得的 }) .source('~/.feat-templates/feathers-template-default/templates/app') // 模板文件位置 .destination(process.cwd()) // 项目位置 .use(msPlugins.filterFiles(options.filters)) // 过滤文件 .use(msPlugins.renderTemplateFiles()) // 渲染模板 .build((err) => {if (err) { log(`Metalsmith build error: ${err}`) } })复制代码
举报/反馈
0
0
收藏
分享
